
【完成】ArduinoIDE1.6.4+ATTiny13Aで赤外線リモコン
お疲れ様です。高橋です。
苦戦していたArduinoIDE1.6.4を使ったATTiny13Aの赤外線リモコン化ですが、やっと動きました。
作る手順
- コピーしたい赤外線リモコンをゲット
- リモコンが発するパターンを知る
- パターンを再現するスケッチを書く
- 1.2MHzで動くよう、FUSEビットをATtiny13Aに書き込む
- スケッチをATtiny13Aに書き込む
1. リモコンをゲット
私は自室の電灯のリモコンをなくしてしまったのですが、隣の部屋に同じ電灯とリモコンがあったので、そのリモコンを使いました。
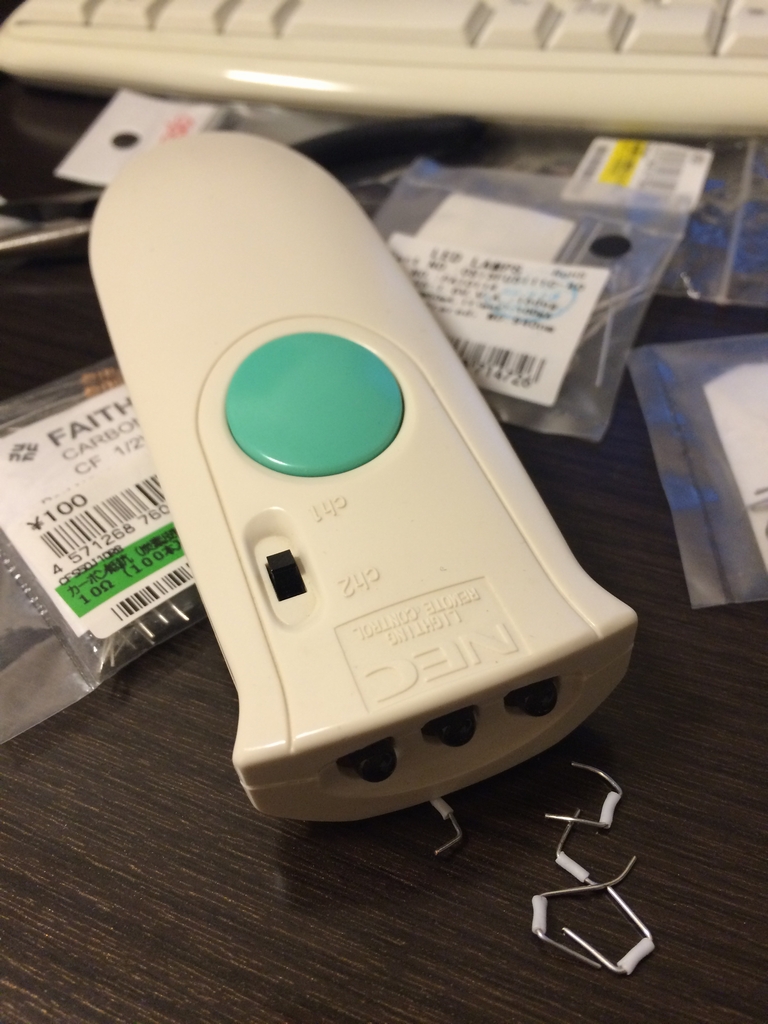
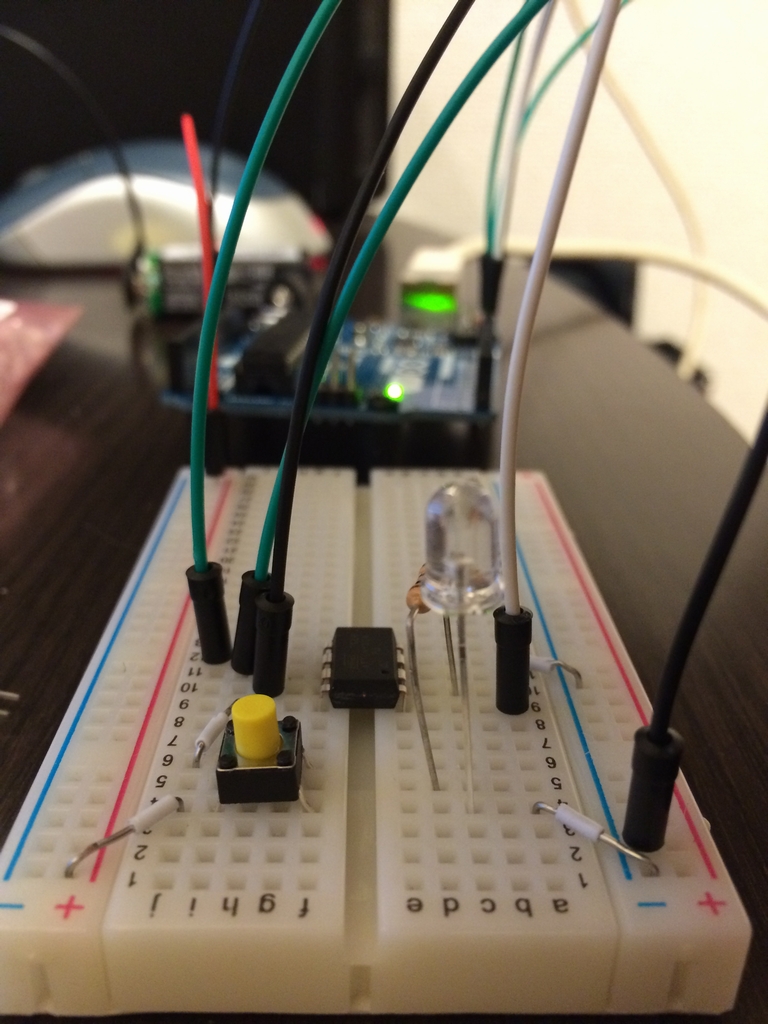
2. リモコンが発するパターンを知る
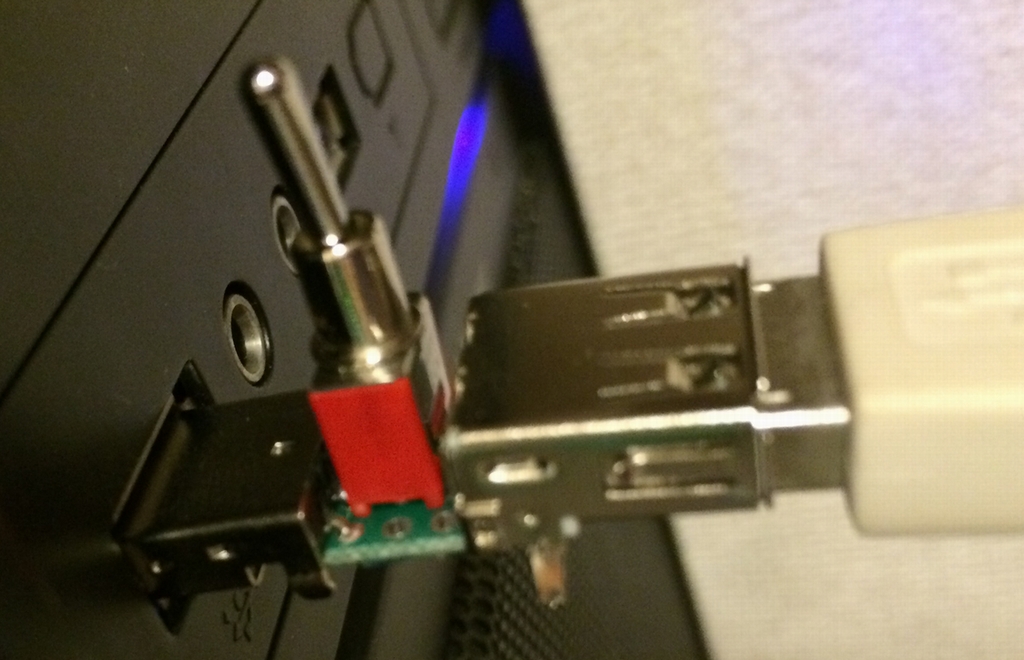
リモコンが発するパターンを知る必要があります。
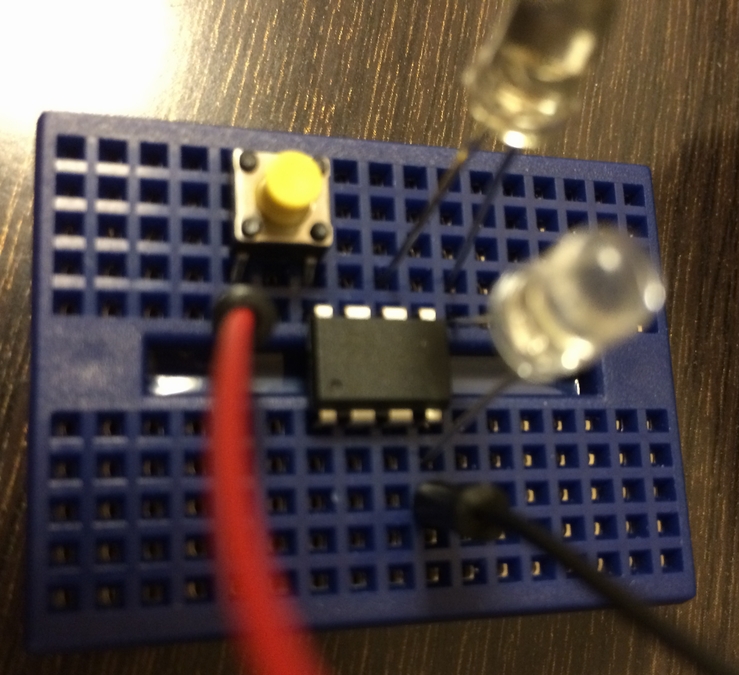
こんな感じで、赤外線受信部品を50円程で秋月で買い、【きむ茶工房ガレージハウス】さんの赤外線リモコンを送信器にして何か動かすを参考にして、電灯のリモコンの発するパターンを取得します。
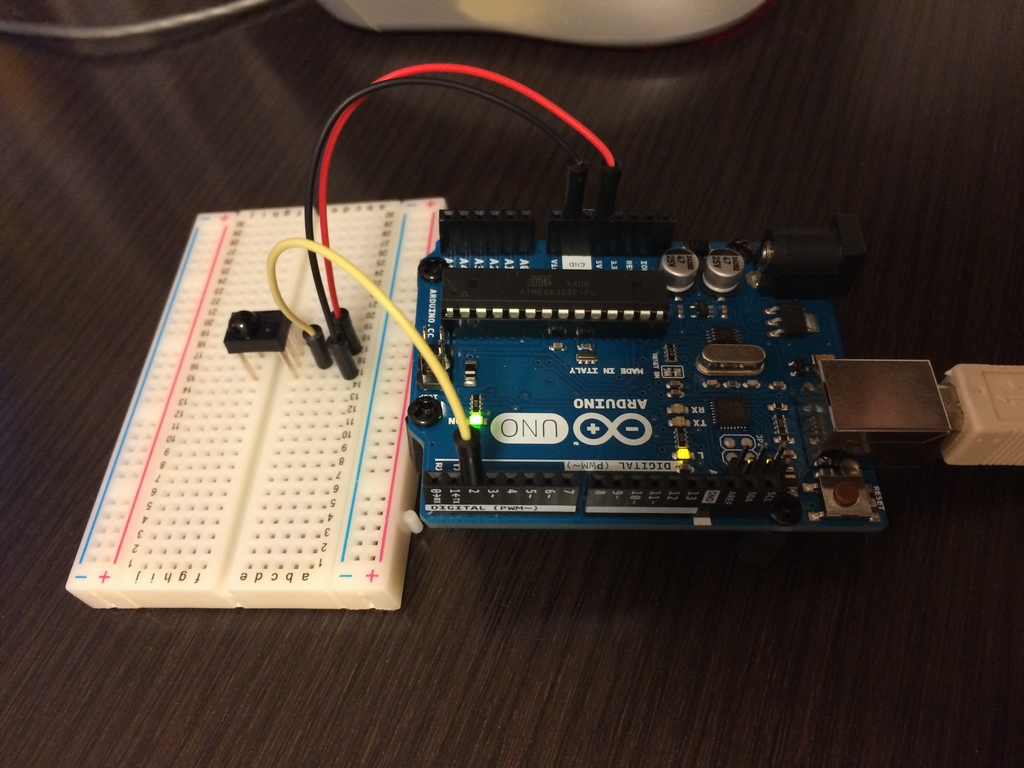
上記サイトを参考にすると、下記のように赤外線パターンを得る事が出来ます。
01000001101101100101100010100111 ( 82 6D 1A E5 )
右端の16進数で表現された4byteの値が重要です。
3. パターンを再現出来るようにする
kenkenpaさんの「PWMについて調べて、リモコン信号出力してみた。」を参考に、スケッチを実装します。
その際、上記サイトのスケッチ内のloop()でコールしているsendIrNEC1M2Hzに与えている引数「0xE41BBF40」を、先ほど取得した赤外線パターン「0x826D1AE5」を与える必要があるのですが、この4バイトを逆転させて与えます。つまり、
sendIrNEC1M2Hz( 0xE51A6D82 )
って感じです。
修正箇所はここだけです。
4. 1.2MHzで動くよう、FUSEビットをATtiny13Aに書き込む
スケッチを書いたらATtiny13Aに書き込む・・・前にやる事があります。動作周波数の設定です。
ATTiny13Aは内部の周波数が128KHz、4.8MHz、9.6MHzの3パターン、用意されています。
で、買ったばかりの状態だと9.6MHzなのですが、さらに追加の設定項目として「分周」というものがあります。分周とは、例えば、2分周だと4.8MHz、8分周だと1.2MHzというように、周波数を分割する際の値です。多分。
買ったばかりの状態だと、周波数自体は9.6MHzなのですが、8分周モード、つまり1.2MHzで動作する状態になってます。
今回のスケッチでは1.2MHz動作のままで良いので、いじらなくても良いです。しかし、何度か実験で使ったATtiny13Aは、今がどの周波数で動いてて分周されてるのかもわからない状態である事が多いと思います。
これを再設定しなおすには、ArduinoIDEから、ブートローダを書き込む必要があります。
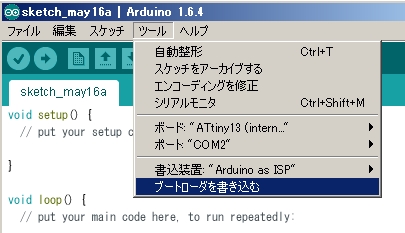
ブートローダを書き込む、といっても、どんな値を書き込むのかが重要です。この値を設定するには「ボード」で設定されたマイコン(上記だとATtiny13 (intern…))の設定情報に依存します。設定情報はどこで書けるかというと、boards.txtです。boards.txtで書き込んだ値は、上記「ブートローダを書き込む」メニューでいきなり書き込まれますが、裏側では様々なコマンドが走っています。それを司っているのがplatform.txtです。boards.txtもplatform.txtも、スケッチを保存するhome/hardware/attiny/avr/の中にあるはずです。
色々いじりまくった最終的な私のboards.txtは下記の通りで、
attiny13-1.name=ATtiny13 (internal 1.2 MHz clock)
attiny13-1.bootloader.low_fuses=0x6a
attiny13-1.bootloader.high_fuses=0xff
attiny13-1.upload.maximum_size=1024
attiny13-1.bootloader.tool=avrdude
attiny13-1.bootloader.path=dummy
attiny13-1.bootloader.file=dummy.hex
attiny13-1.build.mcu=attiny13
attiny13-1.build.f_cpu=1200000L
attiny13-1.build.core=arduino
attiny13-1.build.variant=tiny8
attiny13-1.upload.tool=arduino:avrdude
attiny13-1.bootloader.unlock_bits=0xFF
attiny13-1.bootloader.lock_bits=0xFF

attiny13-8.name=ATtiny13 (internal 9.6 MHz clock)
attiny13-8.bootloader.low_fuses=0x7a
attiny13-8.bootloader.high_fuses=0xff
attiny13-8.upload.maximum_size=1024
attiny13-8.bootloader.tool=avrdude
attiny13-8.bootloader.path=dummy
attiny13-8.bootloader.file=dummy.hex
attiny13-8.build.mcu=attiny13
attiny13-8.build.f_cpu=9600000L
attiny13-8.build.core=arduino
attiny13-8.build.variant=tiny8
attiny13-8.upload.tool=arduino:avrdude
attiny13-8.bootloader.unlock_bits=0xFF
attiny13-8.bootloader.lock_bits=0xFF
platform.txtは下記の通りです。
# Arduino AVR Core and platform.
# ------------------------------
#
# For more info:
# https://github.com/arduino/Arduino/wiki/Arduino-IDE-1.5---3rd-party-Hardware-specification

name=Arduino AVR Boards
version=1.6.7

# AVR compile variables
# ---------------------

compiler.warning_flags=-w
compiler.warning_flags.none=-w
compiler.warning_flags.default=
compiler.warning_flags.more=-Wall
compiler.warning_flags.all=-Wall -Wextra

# Default "compiler.path" is correct, change only if you want to overidde the initial value
compiler.path={runtime.tools.avr-gcc.path}/bin/
compiler.c.cmd=avr-gcc
compiler.c.flags=-c -g -Os {compiler.warning_flags} -ffunction-sections -fdata-sections -MMD
# -w flag added to avoid printing a wrong warning http://gcc.gnu.org/bugzilla/show_bug.cgi?id=59396
# This is fixed in gcc 4.8.3 and will be removed as soon as we update the toolchain
compiler.c.elf.flags={compiler.warning_flags} -Os -Wl,--gc-sections
compiler.c.elf.cmd=avr-gcc
compiler.S.flags=-c -g -x assembler-with-cpp
compiler.cpp.cmd=avr-g++
compiler.cpp.flags=-c -g -Os {compiler.warning_flags} -fno-exceptions -ffunction-sections -fdata-sections -fno-threadsafe-statics -MMD
compiler.ar.cmd=avr-ar
compiler.ar.flags=rcs
compiler.objcopy.cmd=avr-objcopy
compiler.objcopy.eep.flags=-O ihex -j .eeprom --set-section-flags=.eeprom=alloc,load --no-change-warnings --change-section-lma .eeprom=0
compiler.elf2hex.flags=-O ihex -R .eeprom
compiler.elf2hex.cmd=avr-objcopy
compiler.ldflags=
compiler.size.cmd=avr-size

# This can be overriden in boards.txt
build.extra_flags=

# These can be overridden in platform.local.txt
compiler.c.extra_flags=
compiler.c.elf.extra_flags=
compiler.S.extra_flags=
compiler.cpp.extra_flags=
compiler.ar.extra_flags=
compiler.objcopy.eep.extra_flags=
compiler.elf2hex.extra_flags=

# AVR compile patterns
# --------------------

## Compile c files
recipe.c.o.pattern="{compiler.path}{compiler.c.cmd}" {compiler.c.flags} -mmcu={build.mcu} -DF_CPU={build.f_cpu} -DARDUINO={runtime.ide.version} -DARDUINO_{build.board} -DARDUINO_ARCH_{build.arch} {compiler.c.extra_flags} {build.extra_flags} {includes} "{source_file}" -o "{object_file}"

## Compile c++ files
recipe.cpp.o.pattern="{compiler.path}{compiler.cpp.cmd}" {compiler.cpp.flags} -mmcu={build.mcu} -DF_CPU={build.f_cpu} -DARDUINO={runtime.ide.version} -DARDUINO_{build.board} -DARDUINO_ARCH_{build.arch} {compiler.cpp.extra_flags} {build.extra_flags} {includes} "{source_file}" -o "{object_file}"

## Compile S files
recipe.S.o.pattern="{compiler.path}{compiler.c.cmd}" {compiler.S.flags} -mmcu={build.mcu} -DF_CPU={build.f_cpu} -DARDUINO={runtime.ide.version} -DARDUINO_{build.board} -DARDUINO_ARCH_{build.arch} {compiler.S.extra_flags} {build.extra_flags} {includes} "{source_file}" -o "{object_file}"

## Create archives
recipe.ar.pattern="{compiler.path}{compiler.ar.cmd}" {compiler.ar.flags} {compiler.ar.extra_flags} "{build.path}/{archive_file}" "{object_file}"

## Combine gc-sections, archives, and objects
recipe.c.combine.pattern="{compiler.path}{compiler.c.elf.cmd}" {compiler.c.elf.flags} -mmcu={build.mcu} {compiler.c.elf.extra_flags} -o "{build.path}/{build.project_name}.elf" {object_files} "{build.path}/{archive_file}" "-L{build.path}" -lm

## Create output files (.eep and .hex)
recipe.objcopy.eep.pattern="{compiler.path}{compiler.objcopy.cmd}" {compiler.objcopy.eep.flags} {compiler.objcopy.eep.extra_flags} "{build.path}/{build.project_name}.elf" "{build.path}/{build.project_name}.eep"
recipe.objcopy.hex.pattern="{compiler.path}{compiler.elf2hex.cmd}" {compiler.elf2hex.flags} {compiler.elf2hex.extra_flags} "{build.path}/{build.project_name}.elf" "{build.path}/{build.project_name}.hex"

## Compute size
recipe.size.pattern="{compiler.path}{compiler.size.cmd}" -A "{build.path}/{build.project_name}.elf"
recipe.size.regex=^(?:\.text|\.data|\.bootloader)\s+([0-9]+).*
recipe.size.regex.data=^(?:\.data|\.bss|\.noinit)\s+([0-9]+).*
recipe.size.regex.eeprom=^(?:\.eeprom)\s+([0-9]+).*


# AVR Uploader/Programmers tools
# ------------------------------

tools.avrdude.path={runtime.tools.avrdude.path}
tools.avrdude.cmd.path={path}/bin/avrdude
tools.avrdude.config.path={path}/etc/avrdude.conf

tools.avrdude.upload.params.verbose=-v
tools.avrdude.upload.params.quiet=-q -q
tools.avrdude.upload.pattern="{cmd.path}" "-C{config.path}" {upload.verbose} -p{build.mcu} -c{upload.protocol} -P{serial.port} -b{upload.speed} -D "-Uflash:w:{build.path}/{build.project_name}.hex:i"

tools.avrdude.program.params.verbose=-v
tools.avrdude.program.params.quiet=-q -q
tools.avrdude.program.pattern="{cmd.path}" "-C{config.path}" {program.verbose} -p{build.mcu} -c{protocol} {program.extra_params} "-Uflash:w:{build.path}/{build.project_name}.hex:i"

tools.avrdude.erase.params.verbose=-v
tools.avrdude.erase.params.quiet=-q -q
tools.avrdude.erase.pattern="{cmd.path}" "-C{config.path}" {erase.verbose} -p{build.mcu} -c{protocol} {program.extra_params} -e -Uhfuse:w:{bootloader.high_fuses}:m -Ulfuse:w:{bootloader.low_fuses}:m

tools.avrdude.bootloader.params.verbose=-v
tools.avrdude.bootloader.params.quiet=-q -q
tools.avrdude.bootloader.pattern="{cmd.path}" "-C{config.path}" {bootloader.verbose} -p{build.mcu} -c{protocol} {program.extra_params} "-Uflash:w:{runtime.platform.path}\bootloaders\dummy\{bootloader.file}:i"


# USB Default Flags
# Default blank usb manufacturer will be filled it at compile time
# - from numeric vendor ID, set to Unknown otherwise
build.usb_manufacturer="Unknown"
build.usb_flags=-DUSB_VID={build.vid} -DUSB_PID={build.pid} '-DUSB_MANUFACTURER={build.usb_manufacturer}' '-DUSB_PRODUCT={build.usb_product}'
とは言え今回のスケッチは1.2MHz版である事が求められていますので、1.2MHz版のATtiny13Aを選択した状態で、ブートローダを書き込めばOK。買ったばかりのものでも正常動作します。多分。
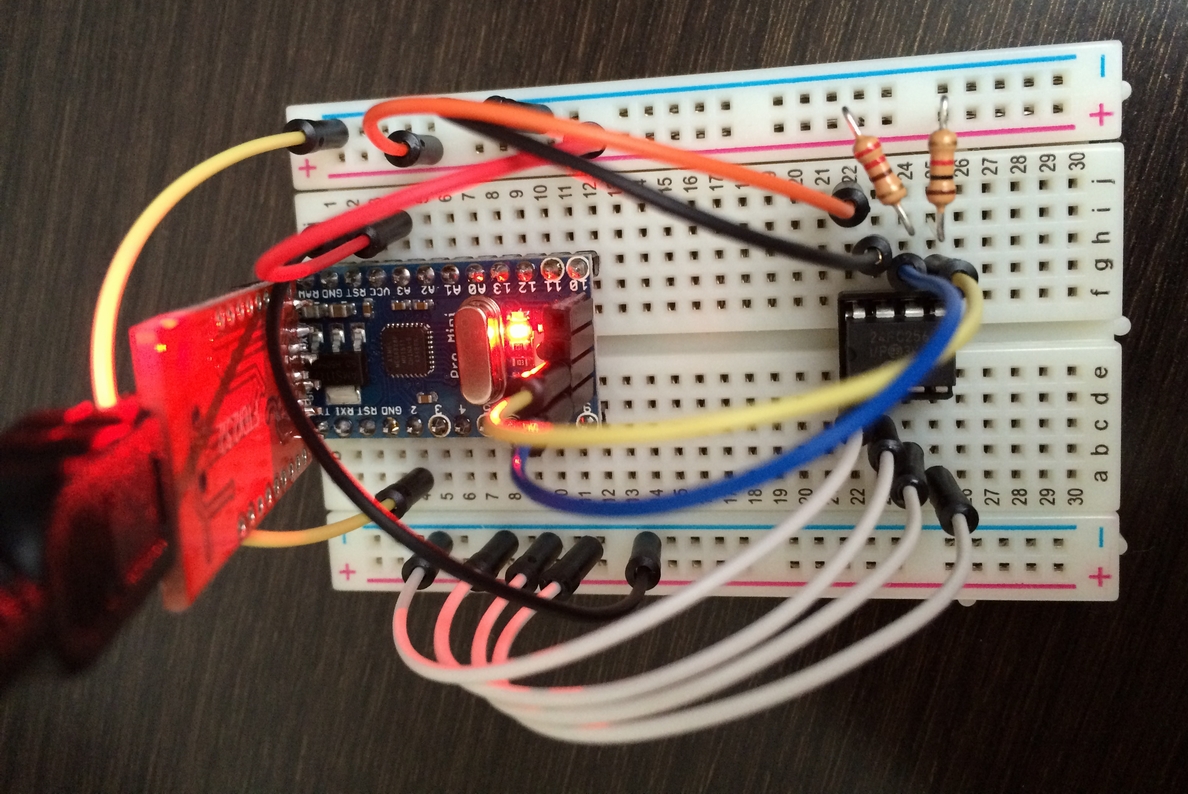
5. スケッチをATtiny13Aに書き込む
ブートローダーを書き込んだら、スケッチを「ATTiny13A 1.2MHz」に向けて、「Arduino as ISP」として書き込みます。
書き込む際は、下記のようにログを出力させておいたほうが、どういう手順でコンパイルと書き込みが行われているのか理解出来ます。
C:\Program Files (x86)\Arduino\hardware\tools\avr/bin/avr-g++ -c -g -Os -w -fno-exceptions -ffunction-sections -fdata-sections -fno-threadsafe-statics -MMD -mmcu=attiny13 -DF_CPU=1200000L -DARDUINO=10604 -DARDUINO_AVR_ATTINY13-1 -DARDUINO_ARCH_AVR -IC:\Users\hoge\Documents\Arduino\hardware\attiny\avr\cores\arduino -IC:\Users\hoge\Documents\Arduino\hardware\attiny\avr\variants\tiny8 C:\Users\hoge\AppData\Local\Temp\build6360964222305673178.tmp\IR_pwm.cpp -o C:\Users\hoge\AppData\Local\Temp\build6360964222305673178.tmp\IR_pwm.cpp.o
Using previously compiled file: C:\Users\hoge\AppData\Local\Temp\build6360964222305673178.tmp\pins_arduino.c.o
Using previously compiled file: C:\Users\hoge\AppData\Local\Temp\build6360964222305673178.tmp\wiring.c.o
Using previously compiled file: C:\Users\hoge\AppData\Local\Temp\build6360964222305673178.tmp\wiring_analog.c.o
Using previously compiled file: C:\Users\hoge\AppData\Local\Temp\build6360964222305673178.tmp\wiring_digital.c.o
Using previously compiled file: C:\Users\hoge\AppData\Local\Temp\build6360964222305673178.tmp\wiring_shift.c.o
Using previously compiled file: C:\Users\hoge\AppData\Local\Temp\build6360964222305673178.tmp\events.cpp.o
Using previously compiled file: C:\Users\hoge\AppData\Local\Temp\build6360964222305673178.tmp\main.cpp.o
Using previously compiled file: C:\Users\hoge\AppData\Local\Temp\build6360964222305673178.tmp\Print.cpp.o
Using previously compiled file: C:\Users\hoge\AppData\Local\Temp\build6360964222305673178.tmp\WMath.cpp.o
Using previously compiled file: C:\Users\hoge\AppData\Local\Temp\build6360964222305673178.tmp\core.a
C:\Program Files (x86)\Arduino\hardware\tools\avr/bin/avr-gcc -w -Os -Wl,--gc-sections -mmcu=attiny13 -o C:\Users\hoge\AppData\Local\Temp\build6360964222305673178.tmp/IR_pwm.cpp.elf C:\Users\hoge\AppData\Local\Temp\build6360964222305673178.tmp\IR_pwm.cpp.o C:\Users\hoge\AppData\Local\Temp\build6360964222305673178.tmp/core.a -LC:\Users\hoge\AppData\Local\Temp\build6360964222305673178.tmp -lm
C:\Program Files (x86)\Arduino\hardware\tools\avr/bin/avr-objcopy -O ihex -j .eeprom --set-section-flags=.eeprom=alloc,load --no-change-warnings --change-section-lma .eeprom=0 C:\Users\hoge\AppData\Local\Temp\build6360964222305673178.tmp/IR_pwm.cpp.elf C:\Users\hoge\AppData\Local\Temp\build6360964222305673178.tmp/IR_pwm.cpp.eep
C:\Program Files (x86)\Arduino\hardware\tools\avr/bin/avr-objcopy -O ihex -R .eeprom C:\Users\hoge\AppData\Local\Temp\build6360964222305673178.tmp/IR_pwm.cpp.elf C:\Users\hoge\AppData\Local\Temp\build6360964222305673178.tmp/IR_pwm.cpp.hex

スケッチが プログラムストレージ領域の 374バイト (36%) を使用しています。最大は 1,024バイト です。
グローバル変数は 4バイトの動的メモリを使用しています
C:\Program Files (x86)\Arduino\hardware\tools\avr/bin/avrdude -CC:\Program Files (x86)\Arduino\hardware\tools\avr/etc/avrdude.conf -v -pattiny13 -cstk500v1 -PCOM6 -b19200 -Uflash:w:C:\Users\hoge\AppData\Local\Temp\build6360964222305673178.tmp/IR_pwm.cpp.hex:i

avrdude: Version 6.0.1, compiled on Apr 15 2015 at 19:59:58
 Copyright (c) 2000-2005 Brian Dean, http://www.bdmicro.com/
 Copyright (c) 2007-2009 Joerg Wunsch

 System wide configuration file is "C:\Program Files (x86)\Arduino\hardware\tools\avr/etc/avrdude.conf"

 Using Port : COM6
 Using Programmer : stk500v1
 Overriding Baud Rate : 19200
 AVR Part : ATtiny13
 Chip Erase delay : 4000 us
 PAGEL : P00
 BS2 : P00
 RESET disposition : dedicated
 RETRY pulse : SCK
 serial program mode : yes
 parallel program mode : yes
 Timeout : 200
 StabDelay : 100
 CmdexeDelay : 25
 SyncLoops : 32
 ByteDelay : 0
 PollIndex : 3
 PollValue : 0x53
 Memory Detail :

 Block Poll Page Polled
 Memory Type Mode Delay Size Indx Paged Size Size #Pages MinW MaxW ReadBack
 ----------- ---- ----- ----- ---- ------ ------ ---- ------ ----- ----- ---------
 eeprom 65 5 4 0 no 64 4 0 4000 4000 0xff 0xff
 flash 65 6 32 0 yes 1024 32 32 4500 4500 0xff 0xff
 signature 0 0 0 0 no 3 0 0 0 0 0x00 0x00
 lock 0 0 0 0 no 1 0 0 4500 4500 0x00 0x00
 calibration 0 0 0 0 no 2 0 0 0 0 0x00 0x00
 lfuse 0 0 0 0 no 1 0 0 4500 4500 0x00 0x00
 hfuse 0 0 0 0 no 1 0 0 4500 4500 0x00 0x00

 Programmer Type : STK500
 Description : Atmel STK500 Version 1.x firmware
 Hardware Version: 2
 Firmware Version: 1.18
 Topcard : Unknown
 Vtarget : 0.0 V
 Varef : 0.0 V
 Oscillator : Off
 SCK period : 0.1 us

avrdude: AVR device initialized and ready to accept instructions

Reading | ################################################## | 100% 0.05s

avrdude: Device signature = 0x1e9007
avrdude: NOTE: "flash" memory has been specified, an erase cycle will be performed
 To disable this feature, specify the -D option.
avrdude: erasing chip
avrdude: reading input file "C:\Users\hoge\AppData\Local\Temp\build6360964222305673178.tmp/IR_pwm.cpp.hex"
avrdude: writing flash (374 bytes):

Writing | ################################################## | 100% 0.98s

avrdude: 374 bytes of flash written
avrdude: verifying flash memory against C:\Users\hoge\AppData\Local\Temp\build6360964222305673178.tmp/IR_pwm.cpp.hex:
avrdude: load data flash data from input file C:\Users\hoge\AppData\Local\Temp\build6360964222305673178.tmp/IR_pwm.cpp.hex:
avrdude: input file C:\Users\hoge\AppData\Local\Temp\build6360964222305673178.tmp/IR_pwm.cpp.hex contains 374 bytes
avrdude: reading on-chip flash data:

Reading | ################################################## | 100% 0.59s

avrdude: verifying ...
avrdude: 374 bytes of flash verified

avrdude done. Thank you.
kenkenpaさんの参考スケッチは、実は中身が高度すぎて、あまり理解出来ていません。
PWMという手法を使って、リモコンの操作に必要な38KHzを作り出しているという事はなんとなくわかるのですが。
スケッチ容量は驚異の374byte!おそらくロジックを色々いじるのではなく、直接ハードウェアを操作する系の記述なんだと思います。それと、前回やっていた方法(マイクロ秒レベルでのLEDの明滅操作)に必要だった赤外線データは、unsigned int型が75個、150byte必要だったのですが、今回はたったの4byteで済んでます。
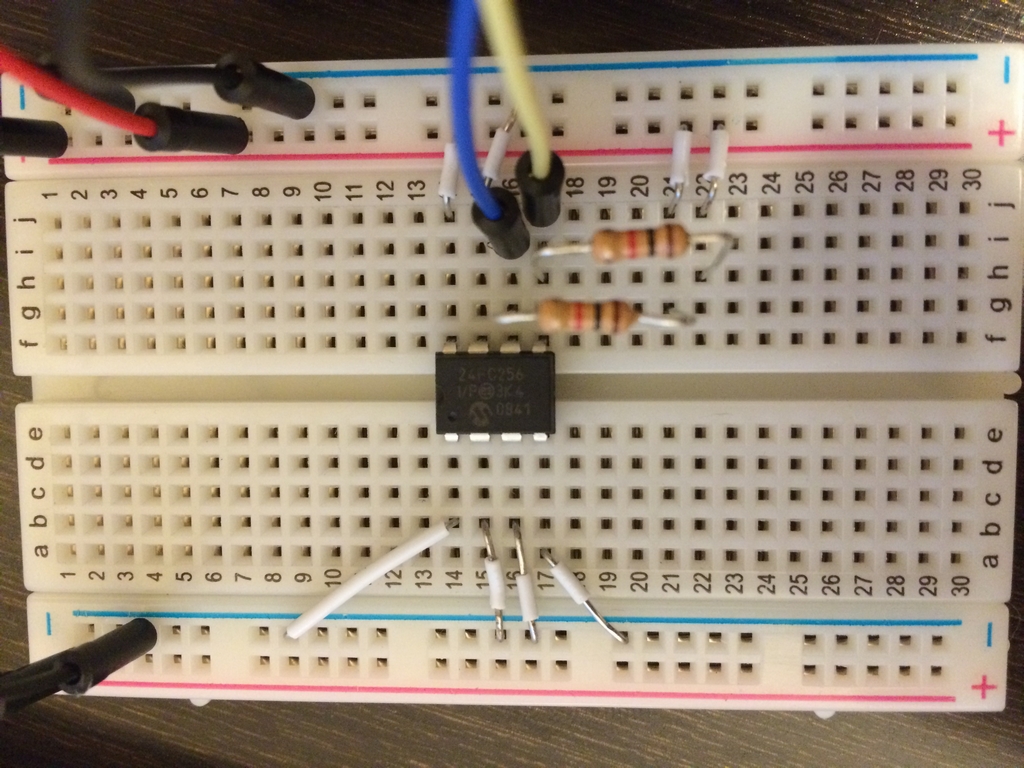
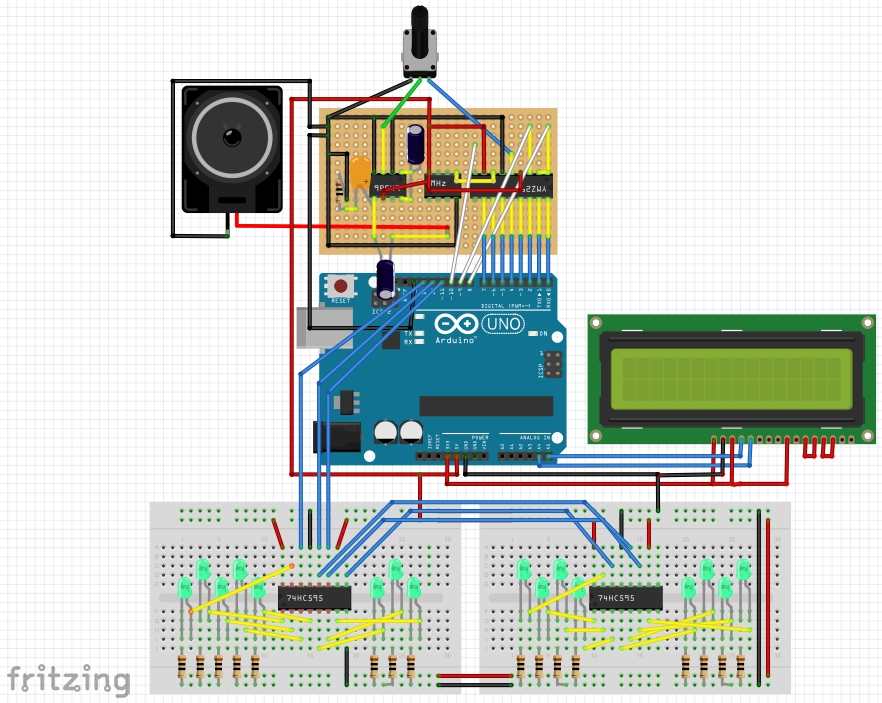
書き込みは下記実体配線図通りに組んだ状態で実施し、
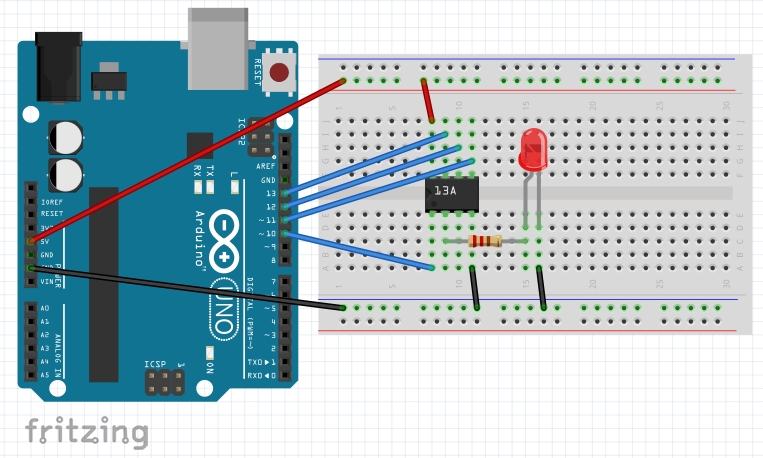
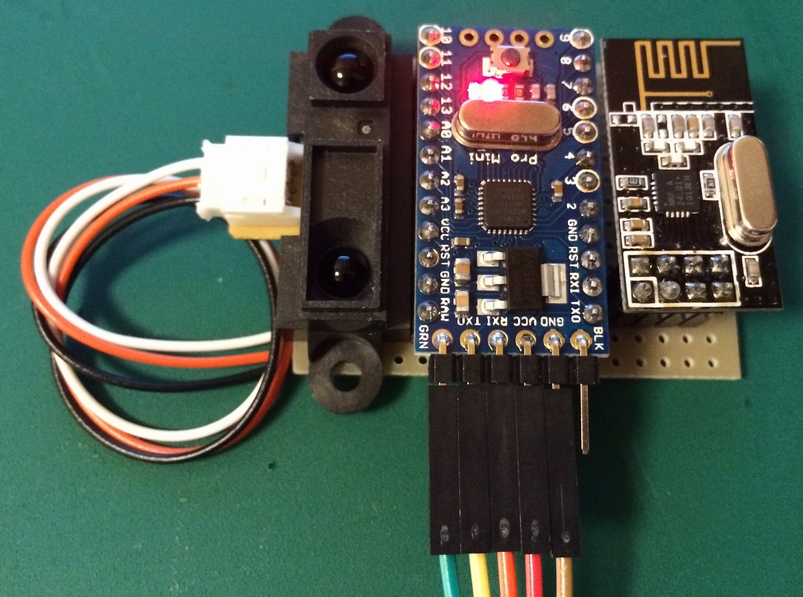
一度ATTiny13Aにスケッチが書き込まれたら、こんなにシンプルになります。
下記が実体配線図です。
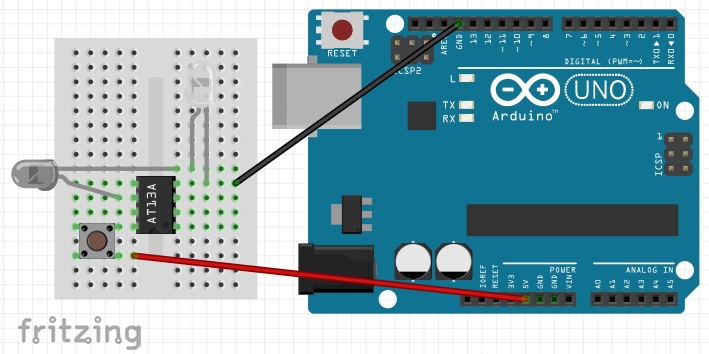
現状、5VとGNDをUNOから引っ張っていますが、ボタン電池化すれば小型化出来ます。
次回は、電池から電源を取り出すにはどんな準備が必要なのか、勉強です。
以上、よろしくお願い致します。
関連記事
-
-
上司離着席検知システムの作り方
お疲れ様です。高橋です。 上司離着席検知システムの作り方は下記の通りです。 必要 …
-
-
音階LED実装 #2
お疲れ様です。高橋です。 本日も昨日に引き続き半田付け。 今日の進捗 昨日の残り …
-
-
Arduino電源ON/OFF機
お疲れ様です。高橋です。 Arduinoを使っている時、特に2個とか複数同時に使 …
-
-
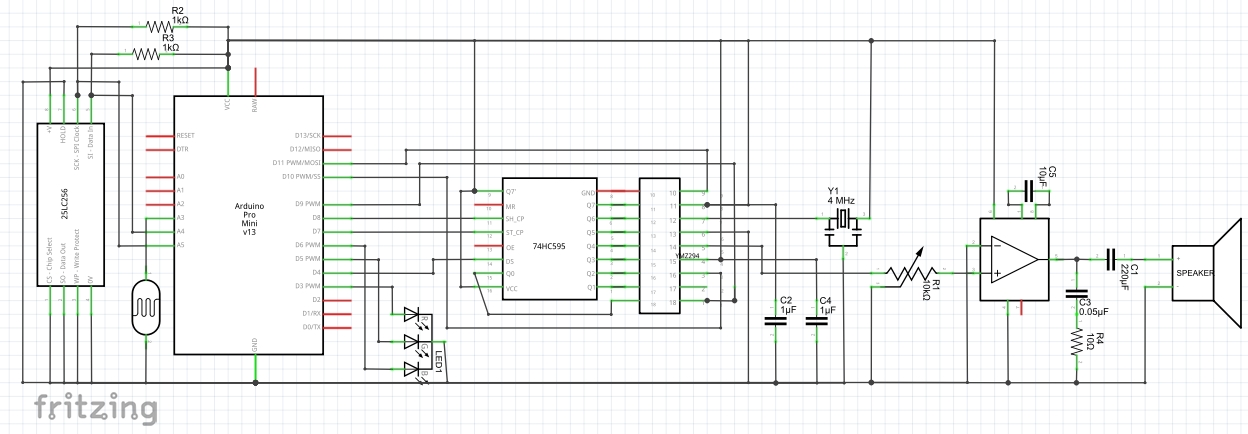
電子オルゴール 回路図
お疲れ様です。高橋です。 電子オルゴールの回路図を書いてみました。 実体配線図よ …
-
-
Arduino+EEPROM+YMZ294で曲の抜き差し
お疲れ様です。高橋です。 I2Cの256KBitなEEPROMに曲データを書き込 …
-
-
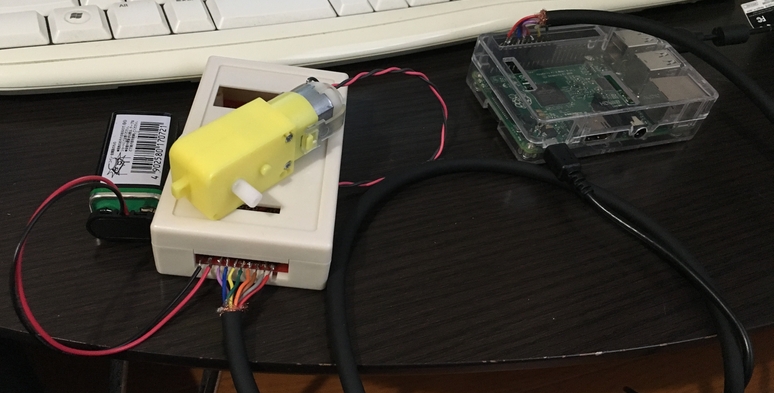
遠隔でRaspberryPi+DCモーターを制御 #2
お疲れ様です。高橋です。 WiMAXが上限オーバー 私の家の自宅回線はWiMAX …
-
-
ArduinoIDE1.6.4+ATTiny13Aで赤外線リモコン
お疲れ様です。高橋です。 先日実験したArduinoで赤外線リモコンの問題点、そ …
-
-
シフトレジスタLED付きのYMZ294回路をFritzingに起こしてみた。
お疲れ様です。高橋です。 ユニバーサル基板で作ったYMZボードと、音階LED及び …
-
-
上司の離着席状態をクラウドに飛ばし、スマホで見れるようにした。
お疲れ様です。高橋です。 前回ブレッドボード上に構築した上司離着席検知システムで …
-
-
PCとArduino間でのシリアル通信を介したEEPROM書き込み(難航)
お疲れ様です。高橋です。 Arduino Pro MiniでI2C EEPROM …
Comment
[…] ①ここをベースに、②ここを参照 […]